


How to Increase Your Vernier Acuity
By Dr. T. J. Tomasi
Keiser University College of Golf Senior Faculty and Director of Research

In a recent tournament a tour pro lined up the winning four-footer and the announcer whispered that it was a straight putt – the key was to hit it firmly into the center of the cup – and when he did, it looked easy – but it wasn’t.
Perfectly straight putts are much harder to judge correctly than most think for two reasons:
(1) You don’t have that many; i.e., most putts have a break, and
(2) You have less hole to work with on a dead straight putt.
Comparing numbers will give you the concept. The hole is 4.25” wide, while the ball is 1.68” wide, giving you only 2.125 inches on either side of dead center. Assuming you pulled the putt merely one inch, then the hole at the point of entry would be only 1.125” wide – and since the ball is wider than that, you’d probably lip out. The same holds for the push.
Vernier Acuity (VA)
So, is there anything you can do to increase your chances of draining the harder-than-it-looks straight putt? The answer is that you can increase what is called your Vernier Acuity (VA), defined by Wikipedia as the “smallest visible offset… that can be detected” – in other words, how well can you locate the relative position of several lines to one another. The good news is that you can improve your ability to tell when several lines align (e.g., the line on your putter, the line on the ball and the line of the start of the putt) by practicing the training technique below.
Note: You might be surprised to know that even professional players have trouble aligning their putting lines. Of course, they make a lot of putts, but some make compensations in either their alignment, their stroke or both to keep the ball on line – and when the heat is on, the compensations are a shaky edifice to depend on.
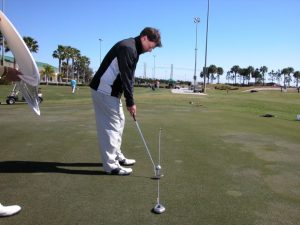
Our model and I have found a straight putt on the practice green and set up a string as a guide, so it stretches to the hole and through the ball. You can also use a chalk line. I’ll ask him to tell me when he thinks he’s lined up, then make the adjustment until he gets used to his new “look.”
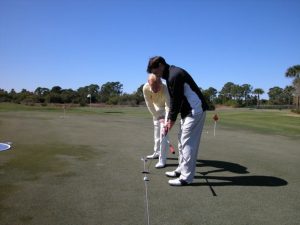
You can suspend the string over the line using another tee inserted behind the ball– that way you can have a true roll to test your stroke. However, here I’m working on his alignment of target, line, ball and putter, not his stroke, so the string is on the ground.
Four Steps to Increase Your Vernier Acuity:
(1) Draw a guideline along the equator of the ball
(2) String a line from the hole back behind the ball per the photo
(3) Place the ball on the target line
(4) Line up the ball line, target line and the mark or line on your putter.
Once the lines are accurately aligned, practice the takeaway of the putter without actually putting, keeping the line on the putter on the target line. Practice all the steps as a unit and keep repeating the unit until you can see the relationships without actually doing it.
If you’d like to study with Dr. Tomasi and other PGA Master Professionals, contact The College of Golf today.


What do you mean by: “practice all the steps as a unit”. What do you mean by “unit”?